Pumpkin Nail Art Guide: Easy to Perfect Designs for Any Occasion
Updated: 02/02/2025
218
Are your nails feeling uninspired this fall? You’re not alone! Many struggle to find the perfect seasonal manicure that captures the essence of autumn.
The solution? Pumpkin Nail Art—a trendy and festive way to embrace cozy vibes right at your fingertips. This guide helps all levels of nail artists make pretty pumpkin designs. Wow, your nails with exciting, spooky styles!
Pumpkin nail art is a fun way to express the fall season. You can do simple or elaborate designs. Use these bold colours to make an impression; thus, let your imagination go wild!
Looking for more DIY nail ideas? Don’t forget to explore our guide on Simple Yellow Nail Art Designs at Home for even more inspiration!
Key Takeaways:
- Master both simple and elaborate pumpkin nail designs, ranging from subtle French tips with pumpkin accents to bold Halloween-inspired masterpieces.
- Explore versatile techniques using different color combinations, including burnt orange, forest green, and pearl base coats, to create unique pumpkin nail designs.
- Learn how to incorporate trendy elements like copper leaf accents, 3D textures, and glow-in-the-dark effects to elevate your fall nail art.
- Discover seasonal trends that blend traditional fall nail designs with contemporary Halloween-inspired elements, perfect for both everyday wear and special occasions.
- Find inspiration for every skill level, whether you’re new to nail art or ready to tackle more complex spectacular designs.
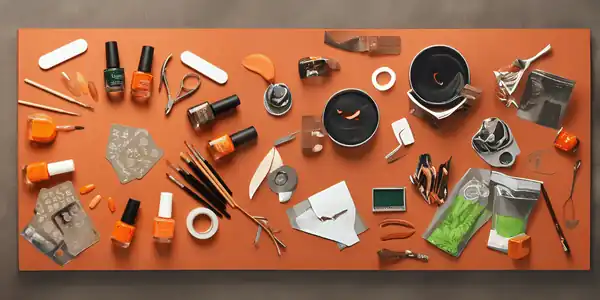
Essential Tools and Materials for Pumpkin Nail Art
Collecting the correct tools and materials is vital prior to starting pumpkin nail art. In order to make amazing seasonal designs, let us look at everything that you will require.
1. Basic Nail Care Essentials
- You need nail clippers, files, and buffers.
- Use base coat and cuticle oil.
- They protect your nails.
- They make nail designs last.
2. Color Selection
Stock up on fall-inspired nail polishes in various finishes. Essential colors include:
- Orange shades (from bright to burnt orange)
- Deep greens for stems
- Browns and neutrals for accents
- Black and white for details
- Metallic gold or copper for added sparkle
3. Artistic Tools
For detailed pumpkin designs, you’ll need:
- Fine-tipped nail art brushes
- Dotting tools in various sizes
- Striping tape for clean lines
- Small sponges for gradient effects
- Clear stamping plates with pumpkin patterns
4. Embellishments and Special Effects
Take your designs to the next level with:
- Glitter in autumn colors
- Rhinestones for sparkly accents
- Nail stickers or decals
- Matte top coat for texture variety
- Chrome powders for metallic effects
5. Essential Finishing Products
Complete your nail art toolkit with:
- Long-lasting top coat
- Quick-dry drops
- Nail polish remover
- Cotton swabs for cleanup
- Acetone for precise corrections
Key Takeaway: A well-stocked nail art toolkit with quality polishes, precise tools, and finishing products is essential for creating professional-looking pumpkin nail designs that last throughout the fall season.
Basic Pumpkin Design Techniques
1. Essential Tools and Materials
- Get orange and green nail polish for pumpkin designs. Use white and black for details. A thin brush will help with lines. Add some metallic polish if you like. Don’t forget a top coat.
- Start with clean nails. Put on a base coat first. This protects your nails. Have cotton swabs handy in case of mistakes.
2. Step-by-Step Application
- Use a light base coat in white or nude. Once it dries, draw small orange pumpkins with a dotting tool.
- Add ridges with dark orange or brown lines from center-outwards. Paint a green stem on top using a thin brush.
- Dot white for highlights to make pumpkins look 3D. Finish with a clear coat for shine and protection.
- Dry each coat fully before the next detail layer; wires can smudge and mix colors. Take time on designs for best results.
Key Takeaway: Properly and following a systematic approach – from base coat to final details – while allowing adequate drying time between layers.
Classic Fall Pumpkin Designs
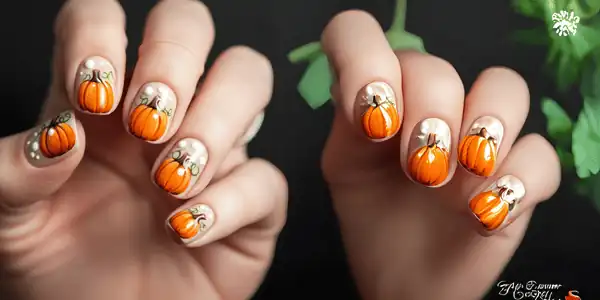
Fall brings the perfect opportunity to embrace the warmth and charm of traditional pumpkin nail designs. Their timeless patterns capture the essence of autumn while maintaining a sophisticated and versatile appeal.
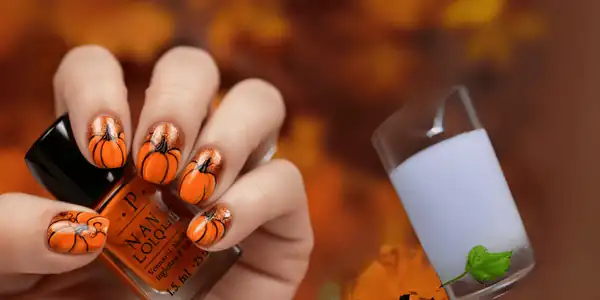
1. Traditional Orange Pumpkins
The pumpkin design is a popular choice for fall nails. Start with orange paint. Add depth with light and dark orange. I use black lines for the stems and segments. For extra shine, I use copper or gold on the pumpkin. This gives a shiny effect. Mix glossy and matte topcoats for texture.
2. Rustic Harvest Elements
Enhance your classic pumpkin designs by incorporating other harvest-inspired elements. Tiny painted leaves in rich autumn colors like burgundy, mustard, and deep green can frame your pumpkin designs beautifully. Add small curling vines or delicate tendrils to create movement and organic flow across your nails.
Consider using earth-toned backgrounds like cream or beige to make your pumpkin designs pop while maintaining that classic fall aesthetic. For a more natural look, incorporate subtle speckling or texture effects that mimic the slightly rough surface of real pumpkins.
Mix different nail designs within the same manicure – alternate between full pumpkin designs and accent nails featuring complementary autumn patterns. This approach keeps the look interesting while maintaining cohesion through color and theme.
Forget not to shield the shape you make with a good top layer. It will last long and shield the tiny details of your seasonal gourd claws. This will also enhance the overall shine and professional finish of your manicure.
Key Takeaway: Classic fall pumpkin nail designs combine traditional orange hues with rustic harvest elements, creating timeless seasonal manicures that perfectly capture autumn’s warm and inviting spirit.
Halloween-Themed Pumpkin Nail Art
Halloween nails are made cool with pumpkin designs. Here are fun ideas for nail art that will impress everyone at the party.
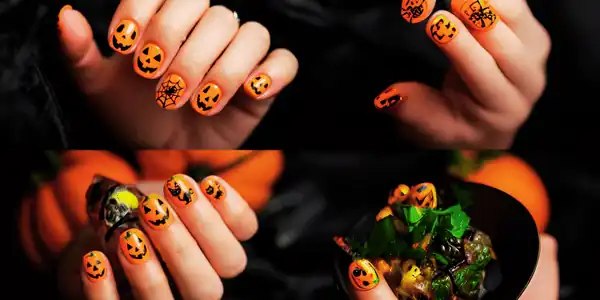
1. Jack-o’-Lantern Faces
Transform your nails into miniature jack-o’-lanterns with expressive faces that range from friendly to frightfully fun. Start with a bright orange base coat, then use black polish to paint various facial expressions. Add tiny white highlights to create a 3D effect that makes your pumpkin faces pop. For an extra eerie touch, consider using a glow-in-the-dark topcoat to make your designs shine in the dark.
2. Spooky Accents and Elements
Take your pumpkin nail art to the next haunting level by incorporating classic Halloween elements. Paint tiny bats flying across a full moon backdrop alongside your pumpkin design. Add delicate spider webs using thin striping tape or a fine detail brush. Mix in some ghostly figures or black cats to create a complete Halloween scene at your fingertips.
Create depth by using metallic accents in copper or gold to highlight certain elements of your design. This adds a sophisticated touch while maintaining the spooky theme. Consider using a matte topcoat on some nails while keeping others glossy for an interesting textural contrast.
3. Color Combinations and Effects
Mixed colors of Halloween are not only orange and black. Try deep purple and metallic orange for a pumpkin scheme, or use black pumpkins on orange backgrounds instead of the usual. Add dimension with chrome powder effects or holographic glitter for a bewitching sparkle.
For a gradient effect, blend orange into black or purple to create an ombré background for your pumpkin designs. Use white or silver accents to create a moonlit effect that makes your nail art appear more mysterious and enchanting. Consider adding texture with microglitters or finely milled shimmer powders to give your design a magical quality.
Remember to seal your Halloween masterpiece with a quality top coat to ensure your spooky design lasts through all your Halloween festivities. This will also enhance the overall shine and protect any 3D elements or special effects you’ve incorporated.
Key Takeaway: Create haunting Halloween pumpkin nail art by combining traditional jack-o’-lantern faces with spooky elements, using innovative color combinations and special effects for a uniquely festive manicure.
Modern and Unique Interpretations
1. Contemporary Twists on Traditional Designs
I try odd colors for pumpkin nail art. Pastel mint green or lavender pumpkins look cute. Use neon colors to make the pumpkins pop. Metallic foils or magnets can make the designs stand out.
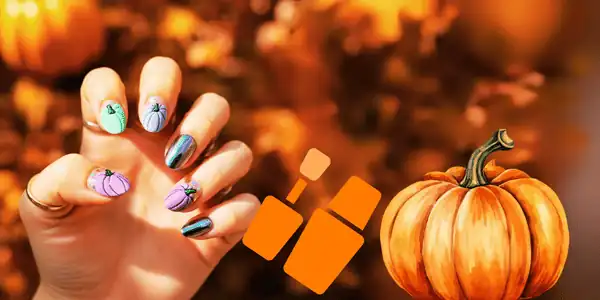
New materials, old pumpkin nail art, and chrome add shine to the orange. Holographic powder gives a magic look. The new styles still feel like fall.
2. Innovative Mixed Media Approaches
Pumpkin nail art can be made better by using different techniques and things. You can add 3D elements like textured gels or dried flowers over painted pumpkins. You can also use a negative space design where the natural nail is part of the artwork.
Water marble has the effect of adapting the colour to obtain abstract pumpkin patterns. To have a geometric design on your pumpkin, you can also use stamping plates. By placing glossy and matte patterns side-by-side, you can make a bold impression that is appealing.
Don’t be afraid to mix unconventional elements like studs, crystals, or even tiny chains to add an edgy, contemporary feel to your seasonal nail art. These unique combinations can transform simple pumpkin designs into conversation-starting pieces that showcase your creativity and style.
Key Takeaway: Modern pumpkin nail art combines traditional motifs with contemporary elements like chrome finishes, unexpected color palettes, and mixed media techniques to create unique, eye-catching designs.
Advanced Design Techniques
1. Creating Dimensional Effects
Transform your pumpkin nail art from flat to fabulous with advanced dimensional techniques. Begin with plain orange. Add light and dark orange colors for depth. For a truly 3D effect, use a dotting tool to create raised dots that form the pumpkin’s shape and texture.

Consider using chrome powders or metallic finishes to add extra dimension. Apply these special effects on specific areas of your pumpkin design to create eye-catching focal points. The reflective properties will make your nail art pop and catch the light beautifully.
2. Professional Finishing Methods
Take your pumpkin nail art to the next level with professional finishing techniques. Begin by applying a ridge-filling base coat to ensure a smooth canvas. When creating detailed pumpkin faces or intricate patterns use a fine-tipped brush for precise lines and clean edges.
For a salon-quality finish, try these expert methods:
- Layer thin coats of polish instead of thick ones
- Use quick-dry drops between layers to prevent smudging
- Apply a matte top coat for a sophisticated velvet-like texture
- Seal your design with a thick, glossy top coat for lasting shine
Experiment with mixed media elements like foils, glitter, or rhinestones to add extra sparkle and texture. Place these embellishments strategically to enhance your pumpkin design without overwhelming it. Remember to seal everything with a generous layer of top coat to ensure durability.
Master the art of gradient effects by using a makeup sponge to blend different orange shades. This creates a realistic pumpkin appearance with natural color variations. For added depth, incorporate subtle gold or copper shimmer to mimic the natural sheen of a pumpkin’s surface.
Key Takeaway: Advanced pumpkin nail art combines dimensional effects with professional finishing techniques, using layering, special finishes, and precise application methods to create stunning, salon-quality designs.
Maintenance and Longevity Tips
Preserving your pumpkin nail art requires careful attention and proper maintenance techniques. Let’s explore some essential tips to keep your seasonal designs looking fresh and fabulous for longer.
1. Daily Care Routine
Apply a coat on top every few days. Keep your hands moisturized, but don’t touch your nails. Do chores carefully with gloves on. This will prevent chipping.
2. Protection Strategies
Keep your nails safe from heat and chemicals. Tap with your fingers, not nails, when texting. Plus, a clear coat on nail tips gives extra defense.
3. Touch-Up Techniques
Keep matching polish colours handy for quick fixes. Small chips can be carefully filled in using a thin brush. For designs with multiple elements, focus on maintaining the pumpkin motif first, as it’s the central feature of your seasonal look.
4. Extending Design Life
Plan for special events. First, apply a good base coat to stop colour stains on nails. After that, use a gel top coat for designs lasting a long time.
5. Signs It’s Time for a Change
Watch for significant lifting at the edges, extensive chipping, or fading of the design. If your nail growth becomes too noticeable or the design starts looking worn, it’s better to refresh your look than try to maintain a deteriorating design.
Key Takeaway: Proper maintenance through regular top coat application, protective measures, and timely touch-ups can extend the life of your pumpkin nail art for up to two weeks while maintaining its seasonal charm.
Conclusion:
Pumpkin nail art is a fun and stylish way to embrace the autumn season! Whether you prefer subtle, elegant designs or bold, spooky creations, there’s a perfect pumpkin nail look for everyone.
Endless Creativity: Experiment with different colours, textures, and accents like copper leaf or glow-in-the-dark effects.
Seasonal Variation: It is fine for going to the patch where pumpkins grow, for Halloween gatherings, and just for enjoying the nice feelings of fall.
Express yourself: Nail art is a reflection of your fun and personality.
Ready to jump nail art skills to the next level? Check out our DIY Metal Nail Art Guide for more creative inspiration! Please don’t forget to share your pumpkin nail designs using #PumpkinNailArt and inspire others with your creativity.
FAQs:
How long does pumpkin nails art typically last?
The pumpkin design on your nails stays pretty for one or two weeks. But you can make it last longer. Keep your hands away from hot water. Apply oil onto your cuticles every day to stop them from chipping.
Can I create pumpkin nail art on natural nails, or do I need artificial extensions?
You can create pumpkin nail designs on both natural and artificial nails. There are many cute pumpkin patterns specifically designed for short, natural nails that look equally stunning.
What’s the best base color to use for pumpkin nail art?
You can use three different base colours: white, nude, or pearl for pumpkin nail art. These colours help the orange pumpkins stand out and look vibrant in your seasonal nail designs.
How can I fix mistakes while creating pumpkin nail art?
You dip a fine brush in nail polish remover and correct mistakes carefully. A toothpick or dotting tool can also be used for precision touch-ups, small details & flaws.
Are there any special tools required for creating pumpkin nail art?
Pumpkin nail art is easy with dotting tools, brushes, and orange polish. Use tape, stamping plates and stripers for complex nail designs, but standard kits suffice for most styles.
How can I make my pumpkin nail art more unique for special occasions?
Try using copper leaves, mirrors, leaves and webs for pumpkin nails. Go beyond orange and black; try new colors, too!
Please Write Your Comments