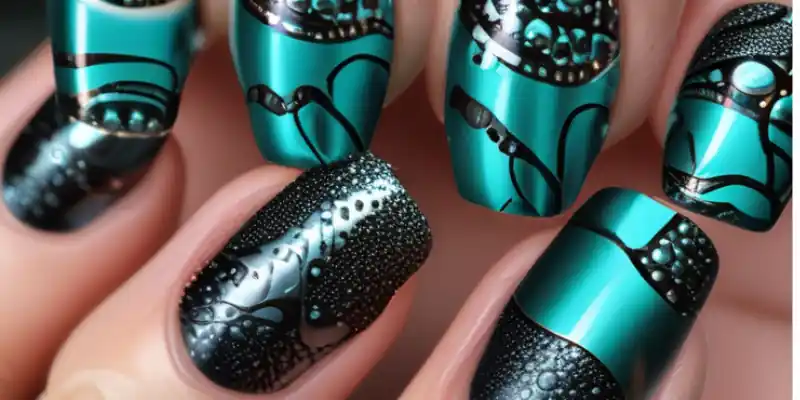
DIY Metal Nail Art: Tips and Techniques for a Glamorous Look
Updated: 25/12/2024
378
Are you ready to show your creativity and add some metallic magic to your nails? Welcome to the world of DIY metal nail art! Even beginners make simple nails look beautiful. This guide shows you how to create amazing patterns that make you and your friends say, “How do you do that?” When I have a school event or a party, I show my style, making my nails look special.

For more ideas and inspiration on creating beautiful nail designs, check out our guide on Rhinestone Shapes for Pink Nail Art.
Introduction to DIY Metal Nail Art
1. Discover the Trend:
DIY Metal Nail Art is an exciting trend that lets you turn your nails into shiny and beautiful designs.
2. Apply Metallic Foils
You apply metallic foils to give your nails a smooth, shiny finish that catches everyone’s attention.
3. Add Edgy Elements
You add small spikes to your nails to create a bold, stylish look with little effort.
4. Personalize with Chains
You use tiny chains in your nail designs to make them unique and show your creativity.
5. Use Magnetic Nail Polish
Magnetic nail polish creates amazing patterns that look layered, shiny, and long-lasting.
6. Master the Techniques
You learn techniques like using a metal nail anchor for strong designs and trying metallic finishes to improve your nail art skills.
7. Perfect for All Skill Levels
This guide helps both beginners and nail art lovers show their personality and style through their nails.
Overview of Metal Nail Art and Its Popularity
A Bold and Edgy Trend
Metal nail art is taking the beauty world by storm, offering a bold and edgy twist to traditional manicure styles.
Various Techniques
| This trend encompasses a variety of techniques, including: |
|---|
|
Unique Expression of Style
Each method offers a unique way to express personal style while embracing the appeal of metallic elements.
Tips for Making a Statement
For those looking to rock DIY metal nail art, consider the following tips:
Choose Complementary Colors: Select shades that enhance the metallic elements.
Ensure a Strong Base: Use a metal nail anchor for added durability.
Suitable for All Skill Levels
Whether I am new to nail art or an experienced pro, experimenting with these techniques can take my nail game to the next level.
Embrace the Trend
I embrace the trend and make my nails shine with metal nail art.I turn my fingertips into a canvas of creativity with metal nail art.I use metallic elements to show my style in nail art.
Benefits of Trying Metal Nail Art at Home
An Innovative Expression of Creativity
I discovered the captivating world of DIY metal nail art, a trend that takes the beauty industry by storm. Metal nail art is an innovative way to combine sleek metallic designs with my style.
Chic and Modern Aesthetic
This artistic form has gained immense popularity because of its chic, modern aesthetic and ability to transform any look into something extraordinary.
Cost-Effectiveness
I try metal nail art at home and enjoy numerous benefits, including cost-effectiveness. I create stunning, salon-quality results without the expense of going to a nail salon.
Satisfying Skill Mastery
I engage in metal nail art at home and enjoy the satisfaction of mastering a new skill. As I practice and experiment, I gain confidence in my abilities.
Endless Customization
Whether I am new to nail art or experienced, metal nail art offers endless ways to customize and show my style, letting me express my personality through my designs.
Dazzling Results
I dive into this exciting trend and make my nail game better with dazzling metallic designs that are sure to turn heads.
Embrace Your Creativity
I embrace the allure of metal nail art and let my creativity shine as I transform my nails into unique works of art!
Gathering Your Materials and Tools
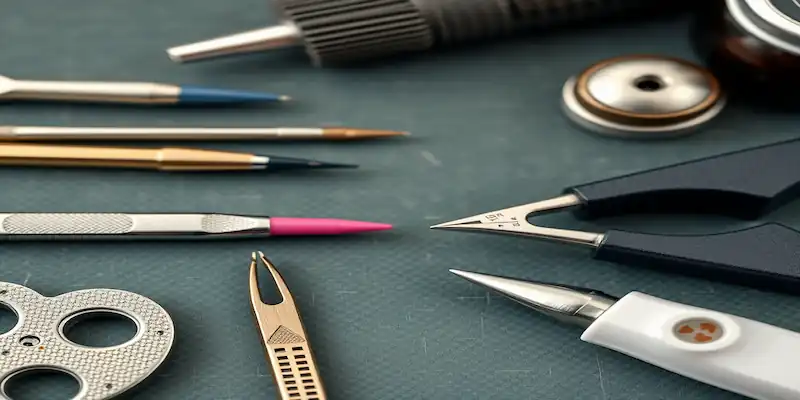
Essential Metal Nail Art Accessories
I embark on the fascinating journey of metal nail art by gathering the right materials and tools to unlock my creativity. I start with high-quality metal nail art accessories, such as metallic foils, studs, and stamping plates. These essential items form the backbone of my artistic toolkit, allowing me to craft intricate designs that captivate and impress.
Precision Tools for Flawless Designs
I invest in precision tools like fine brushes, dotting tools, and a reliable UV lamp. These tools are crucial for making sure my creations are both durable and dazzling. I understand that knowing the importance of each component in my collection will significantly improve my nail art game.
Preparing for Success
I equip myself with these indispensable tools and get ready to explore the limitless possibilities of metal nail art, making my designs stand out in a dazzling display of originality and style. With the right preparation, my journey into the world of metal nail art is bound to be a success.
Essential Tools and Materials Needed for Beginners
I discovered the fascinating world of metal nail art, an innovative trend that captivates both beginners and experienced nail artists. For beginners like me, understanding the essential tools and materials is crucial. Here’s a list to help me get started:
1. Quality Metal Nail Art Kit
Precision Tweezers: I use these to easily handle metallic foils and small embellishments.
Variety of Metallic Nail Foils: I use these to create stunning, reflective designs.
Specialized Adhesive: This ensures the foils and embellishments stay securely in place.
2. Fine-Tipped Brush
This is essential for detailed painting and precision application in my designs.
3. Reliable Top Coat
This provides a protective layer to enhance the longevity of my nail art.
4. UV or LED Lamp
I use this to cure gel products and make my creations more durable.
5. Nail File and Buffer
These help me shape my nails and smooth the surface before application.
6. Dotting Tools
These are great for creating dots and patterns in my designs.
7. Nail Art Stickers or Stencils (optional)
I use these to simplify complex designs and add extra flair.
I use these tools to simplify the process and open endless possibilities for artistic expression. As I experiment with shimmering metallic hues and bold patterns, I elevate my nail art game, turning every manicure into a masterpiece. I embrace this artistic journey and let my nails shine with stunning metal nail art designs that are sure to impress!
Tips on Where to Purchase or How to Choose Quality Supplies
I unlock the secrets to stunning nail designs with expert tips for rocking metal nail art. Selecting the right materials is crucial for achieving an eye-catching look.
Here are some helpful guidelines for me:
1. Shop from Reputable Suppliers
I choose suppliers known for their quality products. I look for established brands or retailers with positive reviews. Online platforms, beauty supply stores, and speciality nail art shops often carry trusted products.
2. Evaluate Product Quality
When I purchase metallic foils and studs, I read reviews and check product descriptions. I make sure the materials are durable and have good adhesion properties for a flawless finish.
3. Consider Variety and Selection
I opt for suppliers that offer a wide range of colours and styles. A diverse selection allows me to have greater creativity and personalization in my designs.
4. Look for Kits
I am considering purchasing complete metal nail art kits that come with everything I need. Kits often include various foils, studs, adhesives, and tools, making it easier for me to get started.
5. Don’t Overlook Accessories
I look for tiny chains, charms, and magnetic nail polish to add elegance. High-quality embellishments greatly enhance my designs and give a shimmering effect..
6. Pay Attention to Ingredients
I check for safe and non-toxic ingredients when I choose adhesives or polishes. I make sure the products are safe, especially if I have sensitive skin or allergies.
7. Invest in Quality Tools
I use high-quality brushes, dotting tools, and lamps to improve my nail art and get better results. I invest in reliable tools to make sure my nail art turns out great.
8. Check Return Policies
Before I make a purchase, I always review the store’s return policy. This gives me peace of mind in case the products do not meet my expectations. Knowing that I can return items if needed helps me feel more confident about my purchase.
By choosing premium supplies, I ensure longevity and vibrancy in my nail art. I embrace these tips to make the best choices, ensuring my metal nail art dazzles and endures. I transform my nails into a masterpiece that captivates and impresses!
Preparing Your Nails for Art Application
I transform my nails into a masterpiece with expert tips for rocking metal nail art. I ensure proper preparation to create a smooth canvas for creativity and make my designs last longer.
Here are the steps I follow to get started:
1. Clean and Shape Your Nails
I begin by removing any old nail polish and cleaning my nails thoroughly. I use a gentle nail cleanser to remove oil and residue. Then, I shape my nails with a nail file to get my desired length and style.
2. Buff the Surface
I lightly buff the surface of my nails with a buffer to create a smooth texture. This step improves adhesion for metallic foils and other embellishments, helping them stick better and last longer.
3. Push Back Cuticles
I gently push back my cuticles with a cuticle pusher. This action helps me create a clean look for my nails. I get more space for my nail design when I do this. It also stops the foil or polish from touching my cuticles, giving me a perfect finish.
4. Apply a Base Coat
I use a high-quality base coat to protect my nails from staining. This coat improves the appearance of my nail art. It creates a protective barrier for my nails. It also helps the nail art stick better and last longer..
5. Experiment with Metallic Foils
I dive into the world of metallic magic by applying metallic foils. These foils give my nails a shiny, reflective finish. They instantly elevate my look. They add a stunning and eye-catching effect to my nails.
6. Add Edgy Elements
I add metal studs or spikes to my design for an edgy twist. These elements make my nails look bold and unique. I use them when I want to make a strong style statement.
7. Incorporate Chains or Charms
I attach tiny chains or charms to my nails for a unique look. These additions create a textured appeal. They enhance the artistry of my nail design and make my style stand out.
8. Use Magnetic Nail Polish
I try using magnetic nail polish for a mesmerizing effect. This polish gives my nails a metallic look that shifts and shimmers. It adds depth to my design and makes my nails look magical.
9. Finish with a Top Coat
I seal my design with a reliable top coat once I finish it. This top coat makes my nail art look polished and shiny. It helps my design last longer and prevents chipping.
I use these techniques to elevate my nail art. They help my designs last longer and look more professional. Whether I am a beginner or an expert, these tips help me create stunning nails. I let my nails make a statement and shine with confidence by embracing the metallic trend.
Step-by-Step Guide to Prepping Nails for Metal Art
I unlock the secrets to stunning nail art with this comprehensive guide! I follow a step-by-step process to prepare my nails for applying metallic foils, studs, spikes, and more, ensuring a flawless application. Perfect for beginners and nail art enthusiasts like me, I am ready to dive in!
Step 1: Gather Your Supplies
Materials Needed: I gather these essential tools and supplies for my nail art: nail polish remover, nail file, buffer, cuticle pusher, base coat, metallic foils, metal studs or spikes, tiny chains or charms, magnetic nail polish, top coat, precision tweezers, and a UV/LED lamp (if I use gel products).
Step 2: Clean Your Nails
I remove any existing nail polish using a gentle nail polish remover. I make sure to cleanse my nails thoroughly to get rid of oils and residue for better adhesion.
Step 3: Shape and File Your Nails
I use a nail file to shape my nails to my desired length and form. Common shapes I choose from include square, round, and almond. I ensure the edges are smooth to avoid snags.
Step 4: Buff the Nail Surface
I lightly buff the surface of each nail with a nail buffer. This step creates a smooth surface that helps the foils and other decorations stick better.
Step 5: Push Back Cuticles
I carefully push back my cuticles using a cuticle pusher. This step creates a neat look for my nails. It also gives me more space for art application and makes my design stand out.
Step 6: Apply a Base Coat
I apply a quality base coat to each nail. This protective layer prevents staining. It also helps my nail art stick better and last longer.
Step 7: Apply Metallic Foils (Optional)
I prepare metallic foils by cutting them into manageable pieces. I apply specialized adhesive to my nails and press the foil onto the wet adhesive. I use tweezers for precise placement. I gently rub to make sure it sticks, then peel away the excess foil.
Step 8: Add Metal Studs or Spikes
I use precision tweezers to place metal studs or spikes onto my nails where I want them. I make sure the base coat is still slightly tacky so the studs or spikes stick properly.
Step 9: Incorporate Chains or Charms
I attach tiny chains or charms for added texture by applying a small amount of nail glue or adhesive. I position them where I want them on my nails and press gently to secure them..
Step 10: Use Magnetic Nail Polish
I apply a coat of magnetic nail polish to each nail as my final touch. I use a magnetic tool over the wet polish to create mesmerizing patterns. Then, I allow the polish to set.
Step 11: Seal Your Design
I finish my nail art with a top coat to seal everything in place. This top coat enhances the shine and makes my design last longer.
Step 12: Cure Your Nails (If Needed)
If I have used gel materials, I cure my nails under a UV or LED lamp according to the product instructions. This step ensures that my nail art is set and ready to dazzle.
Final Step: Admire and Show Off!
Once everything is dry and set, I admire my beautiful creations! I embrace my creativity with confidence and get ready to turn heads with my stunning nail art.
Importance of a Clean and Healthy Nail Base
Achieving a stunning metal nail art look starts with the foundation: a clean and healthy nail base.
This step is crucial for several reasons:
1. Enhanced Adhesion
A clean nail surface helps nail art materials stick better, like metallic foils, studs, and polishes. When my nails are free of oils, residue, and old polish, my design is less likely to chip or peel. This makes my nail art last longer and looks amazing.
2. Prevention of Damage
I know neglecting nail health can weaken or damage my nails. A clean and well-maintained nail base helps me avoid problems like breakage, splits, and infections. Healthy nails give me a strong canvas for nail art and reduce the risk of harm during application.
3. Improved Appearance
When my nails are clean and well-groomed, my nail art looks more polished and professional. A smooth, even surface enhances the overall look and lets the metallic foils and embellishments shine without distractions
4. Creative Exploration
With a solid foundation, I can explore endless possibilities in metal nail art. Applying metallic foils gives my nails a sleek, shiny finish that catches the light beautifully. I push the boundaries of my creativity by adding metal studs, spikes, tiny chains, or charms for an edgy or sophisticated look. Magnetic nail polish is another exciting option that creates eye-catching effects and turns heads..
5. Long-lasting Results
I know that investing time in nail prep pays off. When I focus on keeping my nail base healthy, my designs look amazing and last longer, keeping their vibrancy and charm over time.
6. Personal Expression
A clean and healthy nail base helps me express my style. With the right preparation, my nail art reflects my personality and taste, from trendy metallic designs to intricate details.
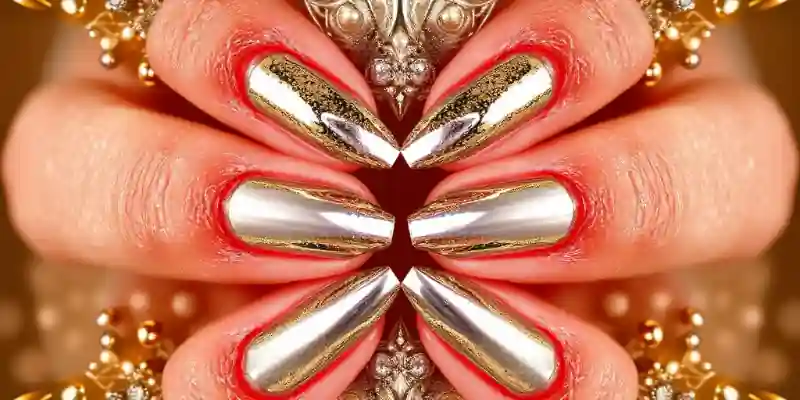
Applying Metal Nail Art
I unlock the captivating world of metal nail art, where creativity meets durability to turn my manicure into a masterpiece. Whether I love the bold look of metal nail anchors, the subtle elegance of metal beads, or the striking impact of chrome finishes, there’s a style for me to explore. I dive into different techniques for applying metal nail art and make my nails the perfect canvas for artistic expression.
1. Choose Your Metal Art Elements
Metal Nail Anchors: Metal nail anchors are perfect for creating intricate designs and adding structure to my art. I use them to anchor other embellishments or create standout focal points that draw attention.
Metal Beads: Metal beads are ideal for adding subtle texture and elegance to my nails. I can scatter them across my nails or line them up to create beautiful patterns.
Chrome Nail Art: Achieve a futuristic, mirror-like finish with chrome powders or polishes. This look is perfect for making a bold statement and catching the light.
2. Preparation Is Key
Before I apply any metal elements, I make sure my nails are thoroughly prepared and clean. A healthy nail base is key to getting the best results. I follow proper prepping techniques to shape, buff, and apply a base coat.
3. Applying Metallic Elements
For Metal Foils: I cut small pieces of metallic foil. After applying the adhesive to my nail, I use a pair of tweezers to gently lay the foil over the adhesive. I smooth it out with my fingers or a soft brush and then remove the excess foil.
For Metal Studs or Spikes: I use a small dot of clear nail adhesive to secure my studs or spikes on the nail. I can create patterns or place them randomly for an eclectic, unique look.
For Chrome Effects: I apply a gel base coat and cure it under a UV/LED lamp. Then, I rub the chrome powder onto my nail using a soft applicator or my finger. I finish with a top coat to seal the effect.
4. Exploring Edgy Themes
Death Metal Nail Art: Combine dark nail polishes (like black or deep purples) with silver or brass metallic accents. Layer some metal studs unevenly for a gritty, rock-inspired aesthetic. This style is all about contrasts and bold choices.
Mixing Styles: Don’t hesitate to experiment with combining different metal elements. Try mixing beads with foils or adding chains alongside chrome for a layered, intricate finish.
5. Final Touches
After applying my metallic elements, I make sure everything is securely attached. Once I am satisfied with my design, I finish with a high-quality top coat to lock in my artwork and give it a glossy finish. If using gel products, cure again as necessary.
6. Show off Your Masterpiece
Once my nails are dry, it’s time to flaunt my stunning metal nail art. Whether it is a casual outing or a special event, my nails will turn heads and express my unique style.
Embrace the Trend
With metal nail art, I can explore endless possibilities and let my nails stand out with stunning, metal-infused creations. This innovative trend can be tailored to suit my personality, ensuring my artistic expression stays at the forefront of my style.
Detailed Instructions on How to Apply Metal Designs
I unlock the secrets to stunning nails with this comprehensive guide on applying metal designs, transforming my manicure into a true masterpiece. Whether I am a nail art enthusiast or a professional, these techniques elevate my skills and enhance my nail game.
1. Prepare Your Nails
Clean Your Nails: Remove any existing polish and cleanse your nails thoroughly with a nail cleanser to ensure they’re free of oils and residue.
Shape and Buff: Use a nail file to shape your nails as desired, and lightly buff the surface to create a smooth base.
Push Back Cuticles: Carefully push back cuticles using a cuticle pusher for a clean look.
2. Use Metal Nail Forms
Select Your Form: Choose metal nail forms suitable for the design you want to create. These forms help define the shape and structure of your nail art.
Application: Apply the forms to your nails according to the manufacturer’s instructions. Ensure they fit snugly and securely to create a flawless base for your design.
3. Create a Flawless Base with Gel
Base Coat: Apply a base coat (gel or regular) and cure (if using gel) under a UV/LED lamp as instructed. A solid base helps in the application of metal designs.
Colour Application: Choose a base colour for your nail art. Apply a coat of your chosen nail polish, ensuring even coverage. Allow it to dry or cure as needed.
4. Applying 3D Metal Gold Nail Art
Choose Your Metal Pieces: Select 3D metal gold pieces like studs, charms, or nail shapes.
Secure the Pieces: Use a dot of nail glue or the top coat to adhere each metal piece to your nails. Position them creatively to enhance your design.
Layering: For added dimension, apply multiple pieces at varying angles or heights. Allow the glue to dry completely before proceeding.
5. Explore Metal Nail Implants
Select Implants: Pick bold metal nail implants or accents that suit your style.
Placement: Apply these implants onto your nails for a distinctive and daring look. Ensure they’re securely attached with nail glue.
Curing: If you’re using gel products, cure again to secure the implants.
6. Enhancing with a Metallic Nail Art Liner
Choosing Your Liner: Select a metallic nail art liner for precision detailing.
Applying the Liner: Shake the liner to mix well, and use the fine brush tip to draw designs or patterns on your nails. You can create stripes, dots, or intricate designs with this liner.
TIP: Steady your hand or rest your elbow on a surface to enhance control while outlining or filling in design elements.
7. Finishing Touches
Top Coat: Once your design is complete and dry, seal everything with a clear top coat to add shine and protection. If you have used gel, cure the top coat accordingly.
Clean-Up: Use a nail brush dipped in remover to clean around the edges and tidy up any excess polish that may have smudged outside your nail line.
8. Admire Your Work
Allow your nails to dry completely before showing off your stunning metallic designs. Make sure to flaunt your masterpiece in any setting!
Embrace the Metallic Nail Art Trend
With these techniques, you’ll be able to apply metal designs and elevate your nail art from ordinary to extraordinary. Embrace your creativity and let your nails reflect your unique style!
Common Techniques for Securing Metal Pieces to Nails
Discover the art of securing metal pieces to nails with these innovative techniques that are transforming nail artistry. Each method adds a unique touch, allowing for creative expression and durability in your designs.
1. Adhesive Nail Glue
How It Works: Nail glue is specially formulated to securely bond artificial nail enhancements and accessories.
Application: I apply a small dot of nail glue to the back of the metal piece (like studs, spikes, or charms) and press it onto the desired area of my nail. I hold it in place for a few seconds to ensure a tight bond.
Tip: I make sure my nails are clean and prepped before applying, as oils can weaken the adhesive.
2. Nail Polish as an Adhesive
How It Works: Some nail polishes can act as a temporary adhesive, especially when they are tacky.
Application: Paint a layer of clear or coloured polish on the nail, and then press the metal piece into the wet polish. Once dry, apply a top coat to secure the piece further.
Tip: This technique works well for lighter metal pieces and can blend into the overall design.
3. Gel Top Coat
How It Works: If I am using gel products, the sticky layer of a gel top coat can often hold metal pieces in place.
Application: After curing my base colour, I apply a thin layer of gel top coat. Before curing, I place the metal pieces on the nail and cure to secure everything.
Tip: Be cautious with the thickness of the gel layer; too much can cause uneven finishes.
4. Double-Sided Nail Tape
How It Works: This tape provides an unnoticeable yet effective hold for lightweight metal pieces.
Application: Cut a small piece of double-sided tape and stick it to my nail. Remove the protective layer and press the metal piece firmly onto the tape.
Tip: This method is ideal for shorter wear, as it may not be as durable for long-term designs.
5. Nail Forms and Molding
How It Works: This technique involves using nail forms or moulds to create a secure base for attaching metal pieces.
Application: Apply a thin layer of acrylic or poly gel over the metal piece, encasing it for durability. Carefully fill and shape after curing.
Tip: This method is great for encapsulating larger metal pieces, ensuring they are integrated into the nail design.
6. Micro Nails or Pins
How It Works: Using tiny nails or pins can create a more permanent attachment for heavier or larger metal pieces.
Application: After applying your base coat and colour, position the metal piece where desired and carefully insert a micro nail or pin through the piece and into the nail.
Tip: This technique is more challenging and is suited for those experienced in nail art.
7. Using Magnetic Nail Polish
How It Works: Magnetic nail polish contains iron particles that react to a magnet, creating unique designs.
Application: Apply a coat of magnetic polish to the nails. After it has dried slightly, use a magnet to create patterns. The reflective quality adds a metallic effect without physical attachments.
Tip: Experiment with different magnet shapes to achieve various designs.
Adding Finishing Touches
1. Elevate Your Nail Art with a Metal Nail Art Brush
A metal nail art brush transforms acrylic designs from basic to breathtaking.
2. Perfect Your Nail Art with Precision Tools
I use precision tools to achieve intricate details and flawless application.
3. Enhance Both Simple and Complex Designs
The metal nail art brush enhances simple designs or crafts complex masterpieces.
4. Start with a Solid Base for Lasting Results
I use a solid base to make sure my creativity leaves a lasting impression.
5. Discover the Ease of Adding Finishing Touches
You achieve salon-quality results by mastering metal nail art techniques at home.
6. Turn Nail Art into a Satisfying Experience
The right tools and techniques make nail art a delightful and satisfying activity.
7. Let Your Nails Become a Canvas
Your nails serve as a canvas for endless possibilities with metal nail art.
Suggestions for Sealing and Protecting Your Nail Art
1. Apply a Clear Base for Long-Lasting Designs
You apply a clear base coat to protect your nails and extend the life of your nail art. A base coat prevents chipping and keeps your designs vibrant for longer.
2. Use a Metal Nail Art Brush for Precision
You choose a quality metal nail art brush to achieve intricate details and a polished look. The brush allows precision for creating sleek finishes and professional-grade designs.
3. Add a Protective Layer for Durability
You seal your nail art with a top coat to provide an extra layer of protection. A top coat enhances shine and ensures your designs stay intact.
4. Perfect Your Finishing Touches
You use the metal nail art brush to refine and enhance the final details of your design. The brush ensures even application to elevate the overall appearance of your manicure.
5. Master the Tools and Techniques for Long-Lasting Beauty
You use the right tools and methods to achieve salon-quality results at home. These techniques protect your nail art and showcase your creativity and style.
Creative Ideas for Personalizing and Enhancing Your Design
1. Transform Acrylic Designs with a Metal Nail Art Brush
A metal nail art brush transforms acrylic designs into stunning masterpieces.
2. Personalize Your Look with Intricate Details
You use a metal nail art brush to apply intricate details and embellishments.
3. Reflect Your Style with Unique Designs
Your nails showcase your unique style by incorporating creative personalization.
4. Add Depth and Dimension with a Metal Base
A metal nail art base adds depth and dimension to your nail art designs.
5. Experiment with Endless Possibilities
You explore various designs using the versatility of metal nail art tools.
6. Stay Ahead in Nail Art Trends
You stay ahead of trends by mastering the art of adding finishing touches with metal.
7. Elevate At-Home Manicures
A metal nail art brush elevates your at-home manicure with professional precision.
8. Unlock Your Creativity with Metal Nail Art
You unlock your creativity and design nails that reflect your artistic flair.
9. Ensure Every Design Stands Out
You use finishing touches to ensure every nail design stands out beautifully.
10. Master Professional-Quality Results
You achieve professional-quality results with the right tools and techniques.
Caring for My Metal Nail Art
1. Clean My Nails Gently
I clean my nails gently with a non-acetone polish remover to avoid tarnishing the metal.
2. Moisturize Regularly
I regularly moisturize my hands and cuticles to prevent dryness, which can affect the appearance of my nail art.
3. Protect My Nails from Harsh Chemicals
When I perform tasks with harsh chemicals or prolonged water exposure, I wear gloves to protect my nails.
4. Store Metal Pieces Safely
I store any removable metal nail pieces in a dry, safe place to prevent damage or loss.
By following these simple tips, I can keep my metal nail art in pristine condition and enjoy my beautiful designs for a long time. A little time spent on maintenance ensures that my metal nail art continues to shine and make a statement.
Tips for Maintaining and Prolonging the Life of My Nail Art
1. Clean My Nails Gently
I clean my nails gently with a soft, lint-free cloth to remove any dirt or debris that might dull their shine.
2. Avoid Harsh Chemicals or Abrasive Tools
I avoid using harsh chemicals or abrasive tools that could damage my intricate designs.
3. Use Non-Acetone Products
When applying lotion or nail oil, I make sure to use non-acetone products, as these are less likely to cause wear.
4. Wear Gloves for Protection
I always wear gloves when doing household chores to protect my nail art from potential scratches or chipping.
5. Store Spare Pieces Safely
I store any spare metal nail pieces in a cool, dry place to prevent tarnishing.
By following these simple tips, I can maintain the beauty and integrity of my metal nail art for weeks. A little extra care helps me keep my nails as dazzling as the day I created them.
Advice on Safely Removing Metal Nails When Necessary
1. Use the Right Tools
I always use reliable tools, like a claw hammer or specialized nail puller, when removing metal nails.
2. Wear Protective Gear
I wear protective gear, including gloves and safety glasses, to prevent accidents during the process.
3. Loosen the Nail First
I gently tap the nail from the side to loosen it before using my tool of choice to remove it.
4. Minimize Damage
By following this method, I safeguard my artwork and minimize damage to the surrounding materials. By mastering these techniques, I can remove metal nails safely while preserving my work. This skill helps me maintain the quality of my projects and take my craftsmanship to the next level.
Conclusion:
I incorporate metal nail art into my designs to make my nails more stylish and creative. I use the right tools and apply the art carefully. I maintain my nails well so I can enjoy long-lasting, shiny metal art. I follow expert tips to keep my nails looking fresh and flawless. I know that whether I am a beginner or experienced, I have endless possibilities with metal nail art. I embrace the trend and make bold statements with my nails.
FAQs:
What is DIY metal nail art?
DIY nail art can have metal parts such as foils, studs, and chains. It makes your nails look fancy and beautiful. You can try it at home.
What tools do I need for metal nail art?
Nail art tools involve a small toolkit with metal nails, thin brushes, a top layer, lamps, files, buffers, and stencils or dots.
How do I apply metal nail art at home?
Begin by cleaning and filing your nails. Next, apply a base coat. Then, add some metallic details. To complete, add a top coat to safeguard the design.
How can I maintain metal nail art for longer wear?
Use a good top coat. Do not expose them to water too much. Be careful while doing stuff to avoid messing up your nail paint.
Please Write Your Comments